Focal Lengths

6 Pics (Focal Length).jpg

In this lesson we went outside with Nikon cameras and reflectors to take photos using different focal lengths to show the difference it makes. We used reflectors to make the photos more interesting and to use different techniques we’d already used with them. We took two photos for all three different focal lengths, 18mm, 35mm & 55mm. We explored the ways that 18mm could give a fish eye effect and that for the Nikon the 55mm was more portrait.

Ellie diptych.jpg

Then for the last part of the lesson we had to take a portrait of someone with 55mm and an item about them with 18mm. We also needed to make them a diptych and use unusual angles in the photos. I used Ellie for my photos and took her in front of a lovely blossoming tree as the pinks of her cheeks went well with the blossom. I then took a photo of a concert bracelet which Ellie has loads of. I took this at an angle which made the hands look bigger closer to the camera.

Diptych – Thursday’s lesson

Jordan Photo with keyboard

In this lesson we had to take a portrait photo of someone around college that wasn’t in our class and then take another photos of something that told the viewer about the person. The photos had to be in the same style and same sort of lighting. For my photo I took a photo of Jordan and then a photo of a keyboard in the library. This meant they had the same lighting. Jordan does IT so he is constantly typing on a keyboard. Then in Photoshop I put both the images into black & white and made them have high opacity so that the photos were more punchy and detailed. After doing that to the photos I then cropped them both down to squares and put them together on a new page on Photoshop. I left a boarder around the photos as well to give it a more soft finish.

Richard Avedon

Avedon is a fashion and portrait photographer who was born to a Jewish family in 1923. He lived in New York and at the age of 12 he became interested in photography after going to a Young Men’s Hebrew Association Camera Club. He used his family’s Kodak Box Brownie to take photos which he used as a way to escape from his life at home. He got his artistic style from his younger sister (Louise) who struggled with  psychiatric treatment which made her very ill and not fully with it. This gave him the love for tragic beauty in his photos.

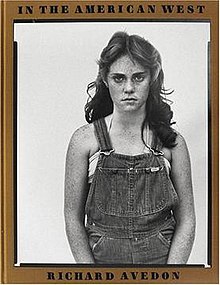
Once he’d fully got into photography he began creating photos that were sometimes measuring over three feet in height. He used a large format camera and went around taking photos of cowboys, miners, drifters and of other people in The United States of America. These photos were in a book called ‘In the American West’ which became popular and even made it to being a best selling book.

In 1974 Avedon became ill due to him suffering a serious heart inflammation which encouraged him to take more photos from a different perspective. This led him to being commissioned by Mitchell A, who was the director of the Amon Carter Museum.

Fill in flash

In this lesson we used two soft boxes to create lovely photos. We placed one light in front and one to the side and swapped between the two of them to be the key light. For boys it is normal for them to have a more light difference whilst for girls it’s normally seen better to have one level of light across the whole face and sculpt it with makeup instead of the lights doing it. Here are some photos we took to show this using different levels of light of a male model and female model:

DSC05190DSC05192DSC05195DSC05199DSC05200DSC05197DSC05198DSC05196

Reflector experimentation

For this lesson we went out and took photos with reflectors as it was a very sunny day. We took photos of back lit, side lit and front lit and then made them better by using reflectors. We also learnt about how light only travels in a straight line and so that’s why things reflect and bounce where the reflector is pointing. We also learnt about how when light travels it becomes weaker and isn’t as bright as this meant we knew to put the reflectors closer to the person if we wanted the light to reflect better. Here are some of the photos I took put into a quidriptych wiReflector uses.jpgth what I did to get them.

Ideas for Final piece

Since I’ve enjoyed taking photographs, the love for water has always interested me too. So for this term I’m excited to try and put the two together. There are many photos including water but I would like to try and create my own unusual photo. I think I’m going to carry on the subject of surrealism as I love the creativity that goes with it. I have a few ideas which I would like to use for my final piece which I’ll adapt as I get closer to the end of the term to make them better. 

First idea: Person in a lake with it up to their waist. They are surrounded by things in the water but the person is acting like nothing is happening that is weird. I would like for it to be a bright day with clear blue sky. This is unusual and gives a unreal setting. I could manipulate the colours to make them more florescent than they actually are giving a fake feeling. The other photo could be of their finger print. This could say that the person wants to drift away like balloons but they are being held down by things in life.

Second idea: Person in a lovely floaty dress on a windy day and they are leaning sideways and there’s water pouring from their ear. I would like this to be in a woods with studio lighting but I don’t see how I would get a power source out there to power them. Prefreably I would like natural lighting to be sun rays streaming through the trees where the person is. The other image could be of her ring or necklace. This could say something about the person having too much to think about it becomes too much and it starts to leak out their ears as water.

Third idea: Photo taken from the top over water of a person underwater with a piece of glass on the top of the water. The person under the water is pressed against the glass with their face sideways and releasing air bubbles so that they can be captured in the photo. The person would preferably be a girl as the rest of the photograph would be filled with hair in the water from the person. I feel this could be taken on a light day using reflectors to bounce the light onto the glass and water nicely. I could take it in my hot tub so that it’s nicer for the person as it’d be warm and also I could turn the lights on so that the water could be red. I would take them at night so that the lights change the water colour a lot. The other photo could be of their eyes. This could show that person feels trapped and that they might have anxiety. 


Some examples of lighting set ups

Here I’m going to be explaining some different lighting styles and show some photos that I took so that you can understand better. They were all taken using a snoot connection onto the studio lighting bulb. Here is a really helpful link too:Lighting styles

Firstly this is broad lighting as the light is only hitting the larger part of the face in the picture. This gives the photo a moody and maybe even evil side. It’s also used to make people look slimmer.

Broad lighting


Now we’ve got the butterfly lighting which is confusing at first but once you understand why it’s been given the name you can spot it easily. The butterfly lighting is done by creating the shadow of the nose underneath which people say looks like a butterfly. Here in my photo the shadow is off to the side a little which does mean its not completely correct. This lighting does a good job of pronouncing cheek bones and jaw lines though.

Butterfly lighting

This is Rambrendt lighting which as you can tell from the name is after the famous painter. In his painting he always creates a triangle of light across onto the opposite cheek.

Rembrandt lighting

Now we come onto short lighting which is created by the main part of the face being in the shadow and the part faced away in the light. For some people this could be used to slim the face but for some people it isn’t very flattering. This style gives a lovely shape to the face and makes you concentrate more on the eyes.

Short lighting

Finally we have split lighting which splits the face down the middle creating a light side and a dark side. This could be used to show a good and bad side of a personality. Normally the face would literally not be visible on one side not like mine where part of it is actually still showing.

Split lighting

Studio lighting around a subject

Lighting circle (Lucy)

We first created a circle with 9 markers in the studio which we marked out with 40% between each one. The circles diameter was around the size of a person lying down. A subject stood in the middle of the circle standing facing one way through out all the photos. A person stood in front of the subject to take each photo. For each photo a soft box was put on one of the markers facing into the centre of the circle and moved onto each marker so that in the photos you can see how the position of the light effects the photo. For the photo above the soft box was put up higher than the subject to act as the key light and as if it’s the sun. The photo above is the 9 photos put together in photoshop.

How I put them together like that:

Open Photoshop

File, new

Document type, international paper

Size A3

Open

View, rulers

View, new guide

With the guides create a 3 by 3 grid

Now move the images into the grid

Use the select tool around the image that you are on the layer on

Press CMD, shift, I

Then press backspace to get rid of everything outside of the box

Do this to all of the photos to make them neat

Then you are done


Then we did the same but with a honeycomb light opposite the soft box going around the circle as well. Those are the photos below.

Circle lighting 2 lights (lucy)

With & without reflectors

Black side of the reflector:

Used to create shadow on side of the face by blocking the light from bouncing back onto the face.

With (left) without (right)


Centre part of the reflector:

Used to defuse the light to make it smoother and less harsh

Without (right) with (left)


Gold side of the reflector:

Used to give a golden look to the skin or give more of a sunny look to the photo.

With (left) without (right)


Silver side of the reflector:

Used to light up the face or the subject of the photo with a strong silver beam.

With (left) without (right)


White side of the reflector:

Does the same as the silver side but isn’t as reflective so doesn’t create as much as an effect.

With (left) without (right)


Final photo using my choice of reflectors:

Photo was taken with the golden reflector and silver reflector on either side. I like how the reflectors have made his face bright and golden creating a more rounded and eye catching photo.

Jordan with reflector


Portrait research

Maria Lough-

http://www.mariasloughphotography.com/index.html

7. Actress - Lily Travers

I like the photo above by Maria Lough for the water that is covering part of the women in the fountain. The colours are lovely and the water creates a weird look to the photo.


11. Moonlight Escape

This photo above is also by Lough and it is a really inspiring photo. The way there are no colours but the lady and her cape giving the lady a distinct look. The boat breaking through the ice is really dramatic to fit in with the setting of a night time lake surrounded by trees.


Jacob Sutton-

http://www.jacobsutton.com/index.php

The photo above is taken my Jacob Sutton and it is taken underwater. There are many photos that have been taken underwater but this one is different as the water is misty giving it a dark feeling to it.


The photo above is also taken by Sutton but taken with a fast shutter speed to capture a man sitting down pulling a container of milk over himself and it splashing everywhere.


Lydia Lingenfeld

http://lydialingenfeld.deviantart.com/art/How-to-Breathe-Underwater-214388386?q=boost%3Apopular+in%3Aphotography+scanner&qo=15

How to Breathe Underwater by ~lydia2693 on deviantART:

I find this piece by Lydia Lingenfeld that’s called ‘How to breath underwater’ really interesting as there’s the water and possibly glass too.