Improving my Final ideas

After trying my first ideas out and thinking about if it would work for the front cover of a magazine, I came up with improved ideas and ones that I felt could be front page quality.

1)

For my first idea I wanted to create a photo in a studio with someone lying down and have them surrounded by things. Well that idea has changed quiet a bit but the basics are the same. Instead of patterns and the person being on a silk blanket, they’d be lying on a cloud of teddy bear stuffing and have massive drawings of thunder storms hanging over them from the ceiling. The person would be wearing fashionable clothing and would probably be a boy so that it could interest girls and boys. I want to make it like a drawing so that’s why the storm clouds are drawings. Also the boy would be shaded with yellow to match the lightning colour and give it the drawing feel. Here is a drawing to show my idea:

IMG_4459.JPG

This is a rough sketch of my idea and I will be shooting the actual Final piece of it soon. I really think this would make a perfect and new idea for a front cover of a magazine. It would easily make people pick it up and it could make people want to feel as awesome as the photo.


2)

For my second idea it hasn’t changed much from last time but now I’ve changed it to being in a shower or somewhere weird. This would be my location portrait and I would use a girl to make it something both a girl and boy would be interested in. I would want the person to wear clothes and makeup to still show the fashion side of it and so it’s really weird. Here is the photo I took:

Mum with foggy glass.jpg

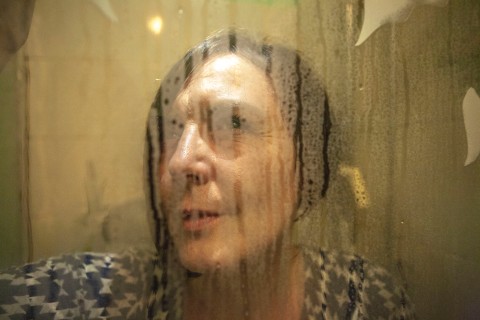
I took this without lighting or setting up properly as I just wanted to see if it would look how I expected and that you could still see the face enough. The only thing that I don’t think worked is that there’s no proper lighting making the photo very dark and grungy. When I take my actually final piece for this I think I’ll use bright lights and do noticeable makeup with a fashionable outfit.

Second Cartoon

Jordan-cartoon

This is my second attempt of making a cartoon of someone. I made it on Photoshop at home for a bit of fun but felt that it was so good that it should be uploaded to my blog. This one is of my boyfriend (Jordan) and I even went to the effort of creating the background behind him. I feel his hair didn’t go well as it isn’t all one block but that is just how cartoons have to be.

Here is the photo of him before being edited:

Photo of Jordan

Making our face a cartoon – pen tool

For this lesson we used the pen tool to make our faces into cartoons on Photoshop.

Screen Shot 2015-11-10 at 11.35.03

Screen Shot 2015-11-10 at 09.34.32

>Firstly bring up a raw picture of yourself into Photoshop.

>Use the pipette tool and click on the back ground to set the colour white

>Go new, put in 29.7, leave second box, then last box put 300

>Cmd A on picture of you, cmd c, cmd v onto the blank page

>Crop the photo down to just the face

>Press shift and alt whilst resizing to make it easier

>Go to the pen tool by pressing the P button

>Then go around the face with the tool and go over the hair line

>Hold alt and press the middle circle to make the next line straight

>Once you have gone all the way around double tap the path you just made and rename it face

>Then go back to layers and press cmd shift N and this will allow you to make a new layer. Name it face

Screen Shot 2015-11-10 at 09.41.05

>Go onto path, press cmd and on the little box that shows the new one

 >This will make the running ants go around the face path you just made

>Now go to the paint pot by pressing G

>Hold alt and click on your face where it’s closest to your skin colour

>Then click inside the running ants. This will fill it with that colour

>Press cmd D to stop the running ants

>Now do the same to the hair, ears and neck

Screen Shot 2015-11-10 at 09.54.21

Screen Shot 2015-11-10 at 10.02.33

Screen Shot 2015-11-10 at 10.06.32

Screen Shot 2015-11-10 at 10.43.36

>Now do the whites of the eyes the same way as before but use white

>Go onto the paintbrush and make it 100% hardness and really small

>Make the colour black

>Go to the path of the white of your eye and right click it

Screen Shot 2015-11-10 at 10.46.50Screen Shot 2015-11-10 at 11.12.10>Choose the stroke path and then the brush selection

>This will make the running ants turn into a black line

>Now do the iris the same way as before but choose the colour you want

>Now do the pupil the same way as the first ones but choose the colour black

>Now do the eyebrows the same way but make them the same as your hair

Screen Shot 2015-11-10 at 11.13.52

>This is what yours should look like but this one still has the picture of me on in the background as I’m still working on it

Screen Shot 2015-11-10 at 11.22.12>Add a nose by using the pen tool to make a cartoon nose shape and then use the stroke path to make it black

>Neaten out the colours with the paintbrush (ect: the neck and hair)

>Go onto google and choose a simple picture for your background

>Make sure it’s a large photo and press open image

Drag the photo to your desktop then from there to Photshop

>Drag the photo onto the cartoon of yourself you are making

>Press cmd T to resize it and drag it onto the background so it fits perfectly

>Make the background just like you made the face with the different layers

 >Make sure all the layers are over the background layer

         Screen Shot 2015-11-10 at 11.35.03

Screen Shot 2015-11-10 at 11.38.43

 >Get rid of the layer that was of your original face as it’s not needed anymore

 >Change the colours of the skin and lips so that they match everything or can be seen (cmd L)

 >Then turn on the layers needed and make sure they are in the correct order

 >Then save it