Final photos in the studio

After changing my ideas and testing what I wanted my final pieces to look like I took my final photos. Here are the ones I took in the light studio but ended up changing to the dark studio so that I could get a stormy look and be able to control the lighting in the photos.

I firstly started by making thunder storms on A3 pieces of card and then cutting them out and connecting them to string. I then once they were connected to the string put them onto a bamboo stick using tape and made sure they were all spaced out and at different heights. I then connected the bamboo stick to a camera pole that was in the studio using tape and positioned it over the set where I was taking my photos. Then to create a cloud I bought 5 bags of teddy bear stuffing and spread out on the studio floor under the clouds that were hanging. I then used yellow face paint to paint my model so that it looked like he’d been shaded.

Here are some photos of me setting the studio up:


I got him to wear fashionable clothing and to look like something that someone would inspire to be like. I wanted the feeling of the photo to be as if it was taken in the clouds and that my model is asleep up there and meanwhile there is a thunderstorm happening above. This is why he has yellow on his body so that it looks like the yellow from the lightning has caused reflections of yellow onto his skin.

Here are the four photos I chose and edited:

close-up-of-cloud-photofar-away-photo-of-cloudsstraight-ahead-clouds-up

straight-forward-clouds

I feel the top two photos are my strongest out of the four I have taken for my final piece as they are from a flattering side angel. I also like the placement of the clouds over him as they bring your eyes down but don’t take full concentration away from the model. I do like the bottom two as well though as they show a different perspective of the cloud world I created and could tell a different story to views. I like the clouds in the last photo as they are placed differently compared to the other photos which shows that I’m experimenting and not just sticking to the same plan. I took them all in portrait as a magazine would need them to fit on the front cover. I feel that they worked really well and when I went out and tested it by talking to people within the age specification about what they thought about the photos, I got positive feedback.

Here are some of the things people said about these photos:
“the cloud images are very imaginative and you have shot them very effectively”

“I like the clouds as it’s a unique idea especially with the face paint”

“The cloud ones are cool and well thought out – tells a story behind the images”

“I like the fluffy cloud photos, incredibly unique”

Improving my Final ideas

After trying my first ideas out and thinking about if it would work for the front cover of a magazine, I came up with improved ideas and ones that I felt could be front page quality.

1)

For my first idea I wanted to create a photo in a studio with someone lying down and have them surrounded by things. Well that idea has changed quiet a bit but the basics are the same. Instead of patterns and the person being on a silk blanket, they’d be lying on a cloud of teddy bear stuffing and have massive drawings of thunder storms hanging over them from the ceiling. The person would be wearing fashionable clothing and would probably be a boy so that it could interest girls and boys. I want to make it like a drawing so that’s why the storm clouds are drawings. Also the boy would be shaded with yellow to match the lightning colour and give it the drawing feel. Here is a drawing to show my idea:

IMG_4459.JPG

This is a rough sketch of my idea and I will be shooting the actual Final piece of it soon. I really think this would make a perfect and new idea for a front cover of a magazine. It would easily make people pick it up and it could make people want to feel as awesome as the photo.


2)

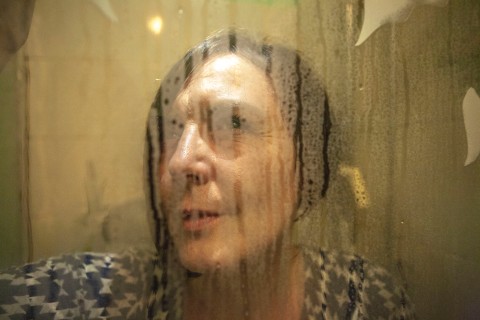
For my second idea it hasn’t changed much from last time but now I’ve changed it to being in a shower or somewhere weird. This would be my location portrait and I would use a girl to make it something both a girl and boy would be interested in. I would want the person to wear clothes and makeup to still show the fashion side of it and so it’s really weird. Here is the photo I took:

Mum with foggy glass.jpg

I took this without lighting or setting up properly as I just wanted to see if it would look how I expected and that you could still see the face enough. The only thing that I don’t think worked is that there’s no proper lighting making the photo very dark and grungy. When I take my actually final piece for this I think I’ll use bright lights and do noticeable makeup with a fashionable outfit.

My Final Piece Ideas

For this project we need to take photos showing the stages of the exhibition in Northampton of our last final piece photos going up and being taken down. We also need to display it so that it tells the story of the exhibition stages easily. The photos can’t just be simply of the exhibition, they need to be creative. I’ve thought of two different ways of taking the photos and how to display them and so I’ll explain them below:


Photo Style 1: 

I could take all my photos of the people working in the exhibition so that the whole stages are shown by the students and how their work is going. This way you’ll be able to know what stage you are at as if their work is up then you know that the exhibition is nearly open or is open but if their work is still going up then it is either not open yet or is being taken down. This also gives the viewers of the photos get to know more about the people and their work. I feel this links the Robert Doisneau as I’m capturing peoples lives just naturally and showing what they are doing without positioning them myself. I like how Doisneau can take photos and nobody notices so I want to try and make the photos like that too.


Photo Style 2:

I could take the photos all from floor level so that you can see what stage the exhibition is at by the shoes people are wearing and the things on the floor such as equipment. This will be a really interesting thing to view as the floor tells a lot about a situation as people won’t be wearing their best shoes to work but will wear their best to look around an exhibition. You can’t normally see everything from floor level but I think that everything could be way more interesting when you have to think about what you’re looking at the know what stage the exhibition is. I feel this links to the photos that Henri Cartier-Bresson took as he takes photos in interesting ways and angles and also captures people when they aren’t expecting it and they also don’t know they are having their photos taken. I’m inspired by his photos and I think my photos will be slightly like his but mine will be by the floor level.


Framing Idea 1:

I could hang them all under each other via string that’s invisible so that they go down in order. This way they can go on a wall and be easy to follow as narrative photos. I also wanted to hang them from each other as a story can’t be a story without the other parts just like the photos hanging from each other as the photo are dependant on hanging from the next one. This framing idea is both practical and attractive.

Framing Idea 2:

img_0608

I could put them in a frame going sideways with two lines with one under the other. This gives the photos a simple display and makes them easy to follow. This idea could also look good on the wall, instead of only being practical. There would have to be an equal amount of photos so that the photo lines can be the same length.

Photos inspired by song lyrics

Katy Perry work

For this lesson we had to create some photos that went with song lyrics. I chose to do some from the song Firework by Katy Perry as it’s inspirational. I decided to use photoshop to create a mix between photos and drawings. I made it seem like a world that isn’t possible by putting photos together to create a corridor of closed doors.  Also through a door I made a sweet wonderland that I drew for the surreal feel. My work took longer than I thought it would meaning I didn’t complete it all in the lesson. I finished it with an extra 20 minuets by positioning them and putting the quote in-between. If I was to do this again I would use the same quote but put more time and effort into the photoshopping skills or not set myself such a difficult task.

Second Cartoon

Jordan-cartoon

This is my second attempt of making a cartoon of someone. I made it on Photoshop at home for a bit of fun but felt that it was so good that it should be uploaded to my blog. This one is of my boyfriend (Jordan) and I even went to the effort of creating the background behind him. I feel his hair didn’t go well as it isn’t all one block but that is just how cartoons have to be.

Here is the photo of him before being edited:

Photo of Jordan

Making our face a cartoon – pen tool

For this lesson we used the pen tool to make our faces into cartoons on Photoshop.

Screen Shot 2015-11-10 at 11.35.03

Screen Shot 2015-11-10 at 09.34.32

>Firstly bring up a raw picture of yourself into Photoshop.

>Use the pipette tool and click on the back ground to set the colour white

>Go new, put in 29.7, leave second box, then last box put 300

>Cmd A on picture of you, cmd c, cmd v onto the blank page

>Crop the photo down to just the face

>Press shift and alt whilst resizing to make it easier

>Go to the pen tool by pressing the P button

>Then go around the face with the tool and go over the hair line

>Hold alt and press the middle circle to make the next line straight

>Once you have gone all the way around double tap the path you just made and rename it face

>Then go back to layers and press cmd shift N and this will allow you to make a new layer. Name it face

Screen Shot 2015-11-10 at 09.41.05

>Go onto path, press cmd and on the little box that shows the new one

 >This will make the running ants go around the face path you just made

>Now go to the paint pot by pressing G

>Hold alt and click on your face where it’s closest to your skin colour

>Then click inside the running ants. This will fill it with that colour

>Press cmd D to stop the running ants

>Now do the same to the hair, ears and neck

Screen Shot 2015-11-10 at 09.54.21

Screen Shot 2015-11-10 at 10.02.33

Screen Shot 2015-11-10 at 10.06.32

Screen Shot 2015-11-10 at 10.43.36

>Now do the whites of the eyes the same way as before but use white

>Go onto the paintbrush and make it 100% hardness and really small

>Make the colour black

>Go to the path of the white of your eye and right click it

Screen Shot 2015-11-10 at 10.46.50Screen Shot 2015-11-10 at 11.12.10>Choose the stroke path and then the brush selection

>This will make the running ants turn into a black line

>Now do the iris the same way as before but choose the colour you want

>Now do the pupil the same way as the first ones but choose the colour black

>Now do the eyebrows the same way but make them the same as your hair

Screen Shot 2015-11-10 at 11.13.52

>This is what yours should look like but this one still has the picture of me on in the background as I’m still working on it

Screen Shot 2015-11-10 at 11.22.12>Add a nose by using the pen tool to make a cartoon nose shape and then use the stroke path to make it black

>Neaten out the colours with the paintbrush (ect: the neck and hair)

>Go onto google and choose a simple picture for your background

>Make sure it’s a large photo and press open image

Drag the photo to your desktop then from there to Photshop

>Drag the photo onto the cartoon of yourself you are making

>Press cmd T to resize it and drag it onto the background so it fits perfectly

>Make the background just like you made the face with the different layers

 >Make sure all the layers are over the background layer

         Screen Shot 2015-11-10 at 11.35.03

Screen Shot 2015-11-10 at 11.38.43

 >Get rid of the layer that was of your original face as it’s not needed anymore

 >Change the colours of the skin and lips so that they match everything or can be seen (cmd L)

 >Then turn on the layers needed and make sure they are in the correct order

 >Then save it