Final photos – Evaluation

After planning my photos, I got my equipment together and went and took my photos. I made sure to stick to my plan as closely as possible but I did change a few things where I felt it would work better. Here are my final photos and how I feel they turned out:
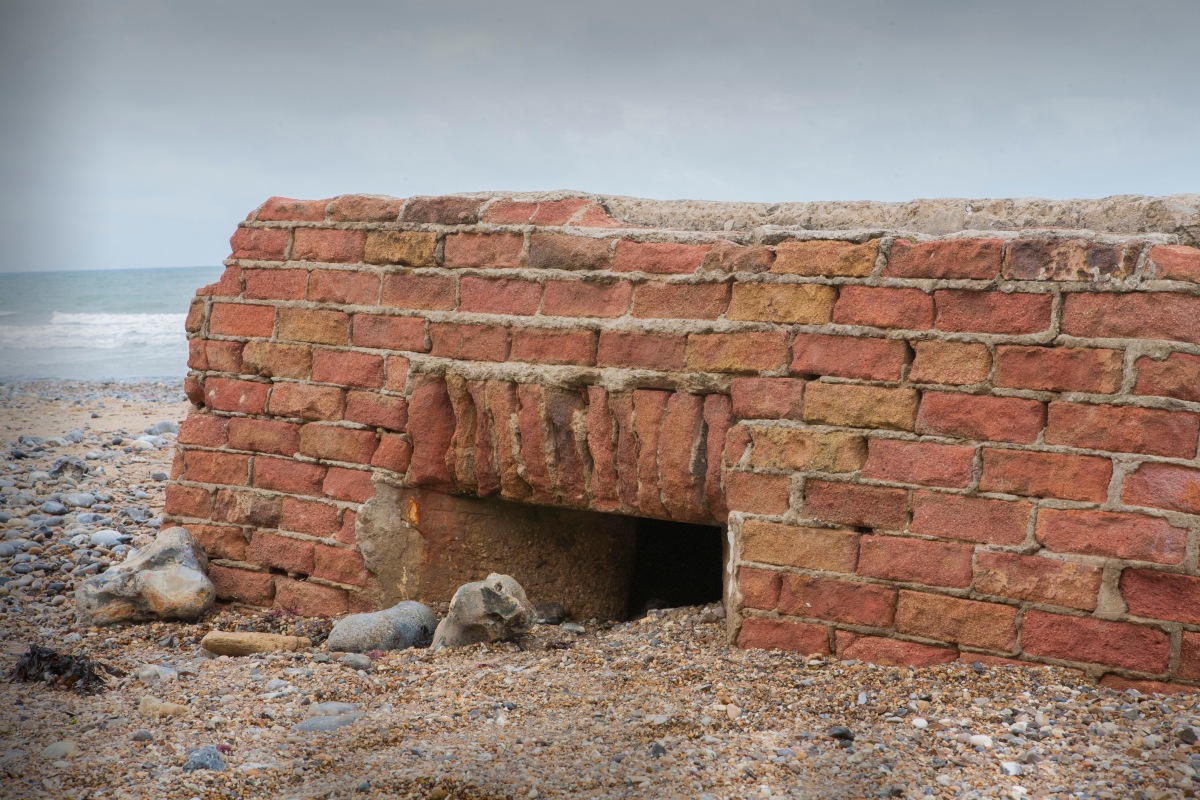
 

Final photo 1.jpg

For my first photo, I took a close up of one of the visible windows and a corner of the building. I felt this showed how much the building is vanishing into the floor/sand and how battered the bricks are too. This building has been through a lot and this really is shown on the corner bricks as they have been rounded off due to the sea passing over it every day. The bricks are no longer set shapes but are more uneven and jagged. The sand is flowing in through the window and filling the building up meaning that the building is inaccessible. In editing I made the outside darker due to Schreck’s work but I kept the building light and unedited as I like that side of Feijen’s work as it means you appreciate the natural look of the building. I did take them on an over cast day which helped get a bright look to the photos and also meant that the sky was completely grey. I like how your eye gets lead to the window and how dark and gloomy it is in there.


Final photo 2.jpg

For my second photo, I tried to concentrate on the slant of the building and how much the building is falling into the sand. I also took it on the side with the door to show how there is no way in and to also show that you wouldn’t possibly know that that is the door way due to how covered up it is. I took the photo from a little away so I could include the beach going into the distance on the left and to have the sea on the right. This shows the surrounds and how out of place the building is. The slant of the building is facing the sea due to the backwash from the waves when it’s high tide. I like how this photo gives you a feel for how much this building is vanishing under the floor and will soon be completely gone.
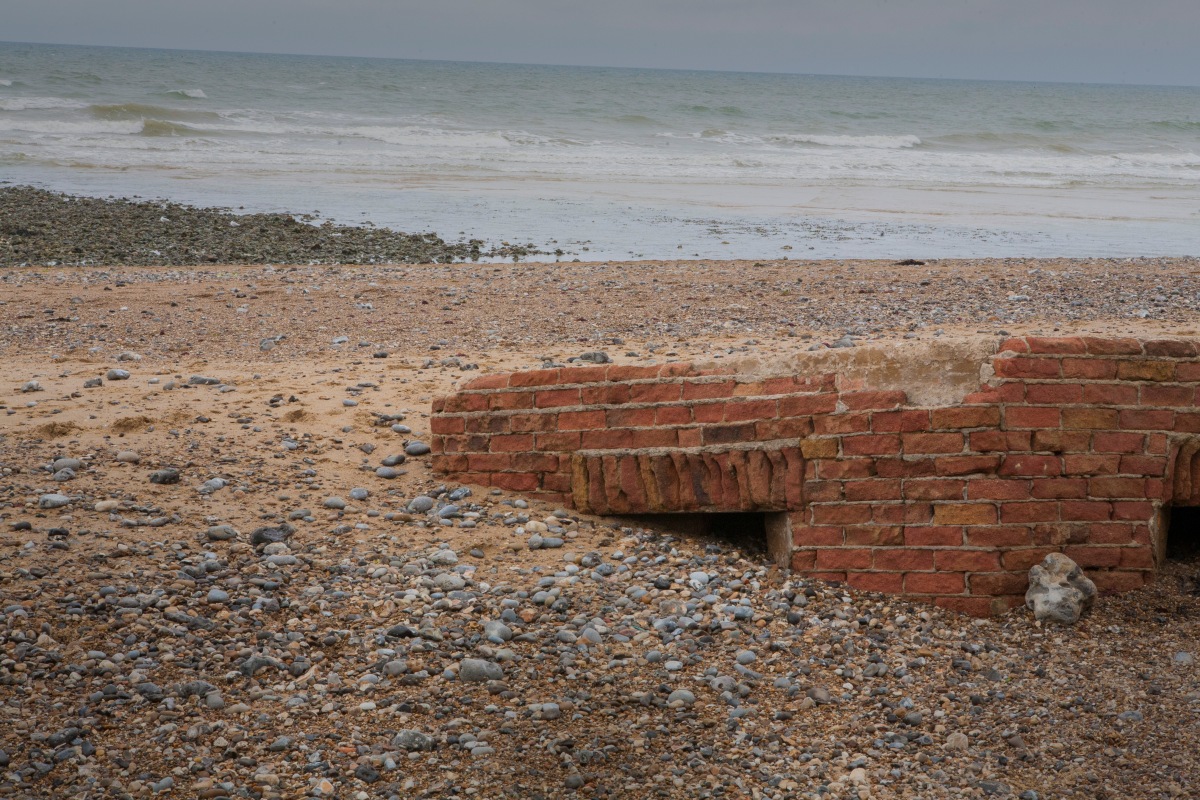
 

Final photo 3.jpg

For the third photo I wanted to show the same as the last photo but show more of the sea to make the viewer feel the threat of it and to understand the power of it and what it can do to a building. The picture also shows a window which is pretty much completely covered and part of another window which is like Schreck’s work where he only showed part of the second bed as it makes you feel like it could go on for ever. You can also see parts of the building where the bricks have come away due to it being battered by the sea. This building isn’t just disappearing; it’s also falling apart. I like this photo due to the feeling of helplessness that the sea makes the viewer feel towards the building.


Final photo 4.jpg

For my fourth photo, I wanted to show the roof of the building being eaten by the floor. The way the sand is creeping up the roof shows the feeling that this building is being swallowed up by the floor/sand and every day it will be more gone and this is actually true as from the time I took my test shots to the point I took my final shoots I couldn’t take a photo through one window and out of the opposite window. It was only a little bit over a week between each shoots and there was already a massive difference in the amount of coverage. I like this photo as it gives a personality to the sand and makes it seem scary.
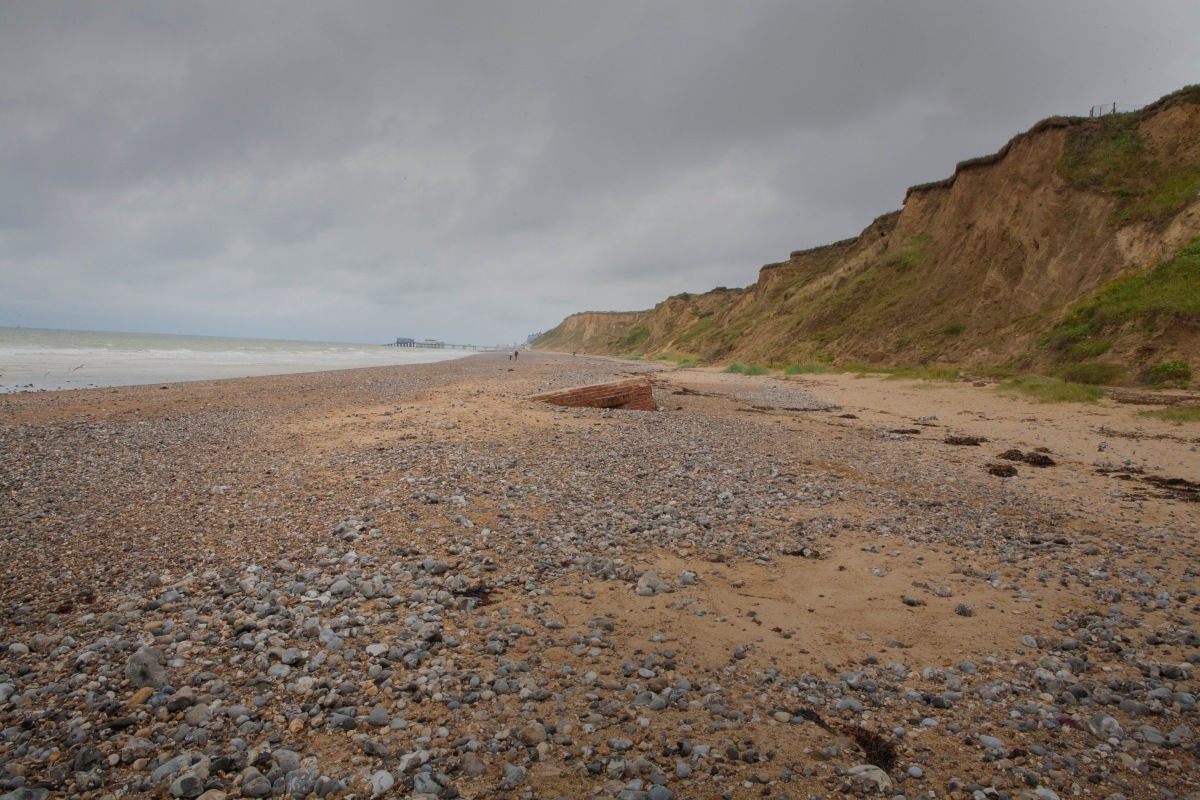
 

Final photo 5.jpg

For my fifth photo, I took a faraway shot of the building to show how unimportant it is on the beach and how it could easily be walked past and not noticed. The beach is so big and vast that the building just isn’t noticed easily and can be walked past. For this photo I included a lot of sky and darkened it to make the photo darker and scary. I would have liked it more if the clouds would have had more texture just like in my test shots as it gives more emotion to the location.


Final photo 6.jpg

For my last photo I took a closer photo from the same angle as the last but the purpose of this is to show how the importance of the building is stolen due to the pier being more important to most holiday guests and anyone on the beach due to the building not being fun or an activity which can be done. This means that the building is not important anymore and this photo really shows why. I also feel having all the people in the background helps prove my point as it shows that they are all walking towards the pier and are not interested in the building. I like how this photo came out and really helps show the viewers that this building doesn’t matter anymore.


Overall I feel that these photos show how buried and forgotten this building has become. The building went from being something that looked after our country to protect us from oncoming enemy boats to an unloved pile of bricks. This is also shown due to it once being on the top of the cliff and now being on the beach demonstrating its importance falling just like it did. I do feel that the clouds could have looked a bit more moody and had more shading but I’m overall happy with the way it shows the story of this building and it’s life on the beach.

Final photos – Planning

After researching different artists work and doing test shots this gave me enough time to experiment and find out enough information on what I want to do for my final photos. After looking at the different styles and using them in my own work, I found that the dark editing but not giving the photos a creepy feel worked best for my final location. After doing all my research I finally decided that I was going to take my final photos at the beach building in Norfolk. I’ve come to this conclusion due to the story behind the building and how forgotten it has become. I also feel that the way it completely vanishes when the tide comes in is crazy and more interesting than the other places I came up with. The thought that at least once a day the building cannot be accessed or seen from land makes the building distinctive as not many things get covered by the sea and stay complete. The building is also inaccessible due to it being mostly under the sand and full of pebbles too. The building is also at a slant due to the sea pulling it under on one side just like pebbles being pulled into the sea due to the backwash.

For my photos I would like to keep the focus on the building so I’m going to do this by trying to take close up photos but I also want to give a size representation and show how insignificant it is compared to everything else around it. I would also like to take them when the sea is pretty far out as I don’t want there to be any danger of getting stuck or splashed when taking the photos. I would also like to take them with natural bright light but not necessarily a sunny day. I like the idea of taking them on a stormy day or even just on an overcast day to give the photos a moody feel.

I would overall like to make the viewer see the beauty of this building once again and to give time to think about its history. I also want people to be intrigued by this photo and to want to find out the history of other places and to open their eyes to see things that they wouldn’t normally look at. I want to make people love the history of places again and to make people consider the story of run down locations.

Final photos


For my final photos I knew I wanted to use a public swimming pool due to the look which they have and so I could use a massive amount of water which just wouldn’t have been possible anywhere else. I did think about using an inflatable swimming pool in my garden but I didn’t feel it gave the same familiar feeling of a public swimming pool and also felt it could give a childish feel to the serious photos.

So I started my search by looking at different swimming pools and looking for ones with deep ends and that had lots of natural light. I wanted a deep end so that when my model ‘fell’ in he wouldn’t have the danger of hitting the floor. I also wanted lots of natural light as using fast shutting speeds makes the photos very dark if there isn’t a large amount of light. After searching for swimming pools to use I found 2 which seemed suitable for my photo shoot so I sent them both an email explaining what I wanted to do and if it would be possible to use their swimming pool. Straight away I got a response from one saying that they were too busy and a day later I got a response from the other saying that they could possibly help. I rang them and spoke to them about the details and they said that they could do it that day whilst they were setting up for a party, giving me only 15 mins to set up and take the photos. I accepted their offer and arrived with all my gear and my model and they were very helpful and couldn’t wait to see someone fall into the swimming pool fully clothed. I did four takes and each time got my model to put dry clothes on so that it would look like it was the real thing each time. This meant we had to work quickly but I soon got the hang of it and was getting a good selection of strong photos. I did at first have problems with starting the burst too soon and my camera stopping taking photos before he even hit the water but I soon got the timing right and got the complete sequence on the last take. I wanted to have 12 photos as I’d planned that I could take that many and I’d worked my zoetrope out to fit 12 photos perfectly. I think I want to edit them possibly but I’m not sure what would look good for the theme that I’m working in.

Here is my last take which got the whole series of photos:

_mg_4054_MG_4055.JPG_MG_4056.JPG_MG_4057.JPG_MG_4058.JPG_MG_4059.JPG_MG_4060.JPG_MG_4061.JPG

I’m really pleased with the different stages of the movement that I captured and how it progresses a little bit more from photo to photo. My favourite photo from the take is the photo just before he hits the water and looks like he is balancing on the side above the water level. In some ways it looks like he’s trying to save himself and balance but it also looks like an elegance dance in midair. I also love the way the water reacts to his flat body hitting it and spraying up around him as if it swallows him. The splashes at the end are showing his struggles and him finding it difficult to get out of the water and the splashes slowing down show he’s not swimming any more but instead is drowning.

I feel that the photos turned out really well and that they possibly need editing to make them better and to give them a stronger main subject. I do really like the sign behind on the wall as it’s warning him that the water is there and it’s deep but he didn’t listen and fell in still showing that it’s his fault and he could have prevented it. I think that the angle from straight ahead works really well as it gives a better look at him struggling and his reaction to falling in. I think that all my test shots of things hitting water really helped me to know that the water would splash the correct way and give the look I’d planned. It meant that I could plan how my model would have to fall to get the correct splash and to make it look the most like they aren’t jumping but instead falling. It’s meant to feel like he’s looking over the water and then he falls in, showing that he could have prevented it from happening if he’d just read the signs and not been so close but this also tells the deeper story. He never listens to people warning him not to do things so he does it anyway and this is the last straw and it’s all catching up on him in a way that makes him feel like he’s drowning because he has so much stress.

I really feel that the paintings by Pedro Covo were a big inspiration for the way I wanted the boy to fall and hit the water and then disappear under it just like the people do in Covo’s paintings. I liked the way you could see the splashes go out in response to the way the person hit it and how all the attention is on the person. I also felt that they were very delicate just like dancers so I really tried to capture this. I tried to make all of those things in my photos and capture the feel of the photos. I really feel the elegance when the boy is falling before hitting the water with his arms out and just balancing on one leg just like a ballet dancer.

I would have liked to be more zoomed in so that when it’s in the zoetrope you can clearly see the subject and the small details that change but I wanted to try and capture all of the splashes created by him falling in which meant I had to be zoomed out as the splashes were bigger than expected.

Final Photos on location:

After changing my ideas and testing what I wanted my final pieces to look like I took my final photos. Here are the ones I took on location in my shower at home.

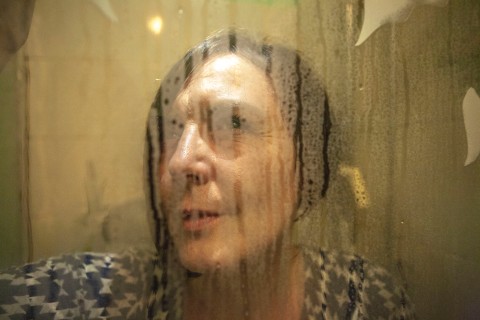
I firstly turned my shower on to hot and shut all the windows and the door to the room so that the room would become foggy and so that the shower door would become wet and misty. I then put red lipstick on my model and turned the shower off. Then I got my model to get into the shower and to stand up close to the door. I then took photos from the other side so I could capture the foggy window in front of my models face. Then when I’d captured a good amount of photos with it like that I rubbed out part of the fogginess on the window so that there was a gap that could be seen through better. Then I took more photos but including the gap that I’d just made. I tried to just have the lips and the nose through the gap as it means that you can’t fully identify the person which creates a sense of the unknown.

Here are some photos of me setting the bathroom up:

IMG_4488.JPG

IMG_4487.JPG

I her to wear a pretty brown dress that was low cut so that the shape of her body could be made out behind the fog making it easier to see that it’s a girl and they are wearing a dress. I also styled her hair so that it was straight and pointed at the edges. I did this so that her hair is noticeable and also catches peoples eyes and makes them want to have their hair like that. There are patterns on the door of my shower which are captured in the photos but I think this makes the photos more bizarre.

Here are the four photos I chose and edited:mum-in-shower

mum-in-shower-2mum-in-shower-3mum-in-shower-4

The top photo is my favourite as the angle is really flattering and the whip through the glass really make the photo become unusual. I also like that the hair in the photo is being caught by the sun which makes it have a nice pop of colour. I feel the top two photos with the whips out worked the best whilst the bottom two photos look good but aren’t as easy to know that they are of someone in the shower as the foggy glass looks weird. I think these photos are bold and fashionable as they catch your eye easily due to the scenery and the pop of red coming from the lipstick. The lipstick is also the thing that could makes it fashionable alongside the hair which is also a main feature of the picture. To make sure that it  wasn’t just me that liked the photo, I went out and asked people within the age brackets what they thought of the photos and they all were very positive.

Here are are the comments people said about my photos:

“I really like how unique your image is and it’s defiantly eye catching. I think using the bright lipstick worked really well and I like how it’s brought to your attention by the wiped clean bit of glass”

“I love the idea behind the theme of the image. Very creative, also love the colours used in the image”

“Unique idea but works really well, I think you captured your ideas perfectly”

“I like how you used something in your everyday life to make a unique photo”


Final photos in the studio

After changing my ideas and testing what I wanted my final pieces to look like I took my final photos. Here are the ones I took in the light studio but ended up changing to the dark studio so that I could get a stormy look and be able to control the lighting in the photos.

I firstly started by making thunder storms on A3 pieces of card and then cutting them out and connecting them to string. I then once they were connected to the string put them onto a bamboo stick using tape and made sure they were all spaced out and at different heights. I then connected the bamboo stick to a camera pole that was in the studio using tape and positioned it over the set where I was taking my photos. Then to create a cloud I bought 5 bags of teddy bear stuffing and spread out on the studio floor under the clouds that were hanging. I then used yellow face paint to paint my model so that it looked like he’d been shaded.

Here are some photos of me setting the studio up:


I got him to wear fashionable clothing and to look like something that someone would inspire to be like. I wanted the feeling of the photo to be as if it was taken in the clouds and that my model is asleep up there and meanwhile there is a thunderstorm happening above. This is why he has yellow on his body so that it looks like the yellow from the lightning has caused reflections of yellow onto his skin.

Here are the four photos I chose and edited:

close-up-of-cloud-photofar-away-photo-of-cloudsstraight-ahead-clouds-up

straight-forward-clouds

I feel the top two photos are my strongest out of the four I have taken for my final piece as they are from a flattering side angel. I also like the placement of the clouds over him as they bring your eyes down but don’t take full concentration away from the model. I do like the bottom two as well though as they show a different perspective of the cloud world I created and could tell a different story to views. I like the clouds in the last photo as they are placed differently compared to the other photos which shows that I’m experimenting and not just sticking to the same plan. I took them all in portrait as a magazine would need them to fit on the front cover. I feel that they worked really well and when I went out and tested it by talking to people within the age specification about what they thought about the photos, I got positive feedback.

Here are some of the things people said about these photos:
“the cloud images are very imaginative and you have shot them very effectively”

“I like the clouds as it’s a unique idea especially with the face paint”

“The cloud ones are cool and well thought out – tells a story behind the images”

“I like the fluffy cloud photos, incredibly unique”

Improving my Final ideas

After trying my first ideas out and thinking about if it would work for the front cover of a magazine, I came up with improved ideas and ones that I felt could be front page quality.

1)

For my first idea I wanted to create a photo in a studio with someone lying down and have them surrounded by things. Well that idea has changed quiet a bit but the basics are the same. Instead of patterns and the person being on a silk blanket, they’d be lying on a cloud of teddy bear stuffing and have massive drawings of thunder storms hanging over them from the ceiling. The person would be wearing fashionable clothing and would probably be a boy so that it could interest girls and boys. I want to make it like a drawing so that’s why the storm clouds are drawings. Also the boy would be shaded with yellow to match the lightning colour and give it the drawing feel. Here is a drawing to show my idea:

IMG_4459.JPG

This is a rough sketch of my idea and I will be shooting the actual Final piece of it soon. I really think this would make a perfect and new idea for a front cover of a magazine. It would easily make people pick it up and it could make people want to feel as awesome as the photo.


2)

For my second idea it hasn’t changed much from last time but now I’ve changed it to being in a shower or somewhere weird. This would be my location portrait and I would use a girl to make it something both a girl and boy would be interested in. I would want the person to wear clothes and makeup to still show the fashion side of it and so it’s really weird. Here is the photo I took:

Mum with foggy glass.jpg

I took this without lighting or setting up properly as I just wanted to see if it would look how I expected and that you could still see the face enough. The only thing that I don’t think worked is that there’s no proper lighting making the photo very dark and grungy. When I take my actually final piece for this I think I’ll use bright lights and do noticeable makeup with a fashionable outfit.

Assignment 1 & 2 research

For this assignment we have to take portrait photos in a studio and on location. They both need to be for the front cover of a magazine for people between the age of 16 to 24 to make them feel inspired and want to look like that. The photos have to be different to what is already out there and has been done before. To start we need to research what people have already done and so that we can make ours different. We also need to find inspiration for our photos.

What is already out there:

The three photos above show the simple poses for women where they just look pretty and are side on to the camera so that they can make the model look more elegant. This is normal and basic so it’s something that need to stay away from doing.

The five photos above are more adventurous and not something that you would normally find. They are bizarre and not something you would feel inspired by so it’s still not something that I want to copy for my photos.

Inspiration for my photos:

I really like the idea of working with steam and water to give an unusual look to the photos so that they aren’t easy to understand at first. The photos above are really interesting and give a weird look to the person. They are taken by David Ryle in a serious of photos called Trifecta.

This photo above is another example where the photo is made interesting due to a layer being in the way making it easier to manipulate the photo with it.

Here is a drawing of eyes with the makeup and paint running down. I feel this could be interesting to make the face have imperfections like makeup.

The photo above is of the Rolling Stones by David Bailey and it’s interesting due to the material that is on their face and being blown around. You can still see their faces still which means that it’s still something that could be used on a magazine.

I really like the makeup in the photo above and how it is all similar colours and the flowers make the photos pop with colour and make it interesting.

I like the background idea for this photo above as its pretty and simple. Could be something to think about.

I’m really interesting in this one for my studio photo as it’s really different and not something that is normally on the front cover of a magazine. I like the blanket in the background and how they are lying down and not all of them are showing as they are sort of writhing around.

Final Piece

After I’d decided my photography style and how I was going to display them I went out and took the photos from beginning to end of the exhibition which was over 2 weeks. When I’d got all my photos taken, I edited them and sized them all to A5 so they could be printed. In the end I had 11 final photos which I felt showed the stages of the exhibition really well. Here are the photos edited and sized to A5:


I got them all printed out and connected them together with a continues piece of translucent wire using a needle to thread them through the photos so that there aren’t massive holes in them. The wire travels along the back of the photos and comes over the top in the gaps and is held in place with tape so the photos don’t move around. I really like how they look and how long they are when connected together. I feel it’s eye catching and tells the story really well but with not too many photos. I think the photo angles do have a look of Henri Cartier-Bresson to them and have a really interesting feel to them.

Overall I feel the photos work really well for a narrative story and create an easy way of viewing it too. The floor angle gives the photos a quirky and uncommon look to my project. If I had to do them again I would captured an equal amount of each part of the exhibition going up so that the photos are mostly of the putting up like mine.

Development of Final Ideas

After thinking and trying out my ideas, I have photos to show how they are going and which one I’m preferring and I want to use. I also have thought about how I would like them to be displayed and I will be discussing this also.

Photo Style 1:

I tried this out and got many photos of people working on their work from just putting up to just finishing up the final details. I feel it does connect with the people but you can’t easily tell what point the exhibitions at from them putting their work up as everyone is at different stages at the same time. Meaning that I don’t think this would be a good idea for showing the stages of the exhibition. I feel like I captured the same kind of style as Doisneau as the others in the class didn’t seem to notice me taking the photographs, like I was somehow hidden and the photos are completely natural. Here are a few of the photos I took in this style:

People working 1

Working people 2


Photo Style 2:

I tried this out and decided that I’d change it a little so that it’s not fully from the floor but more from a crouched potion so that I can capture more of the exhibition in my photos. I feel the photos are perfect for showing the stages of the exhibition and what people are getting up to. The photos show what is happening and what stage it is perfectly and they are interesting to look at too. What is really good, which I hadn’t thought of before taking these photos is that you don’t just capture what one person is doing you get to see what loads of people are doing in exhibition. I feel like Henri Cartier-Bresson photos helped influence the angles I captured in these photos. Here are the photos I took in this style:

Floor photo 1Floor photo 2


Photo style I’ve chosen to use:

I’m going to be taking my photos at floor level as it’s an angle that is not seen much but can give us a lot of information from the shoes we can see or the state the floor is in. If the floor is dirty then it’s not fit to have people come around and see it and if people are wearing fancy shoes then it’s most likely open. The floor is some what the base of a story and is very important for details. As I said earlier I won’t take the photos straight from the floor but at a crouching position so that more can be seen.

The framing I’ve chosen to do:

For framing I’ve decided to do the ones that hang from each other as I feel it will make the photos more interesting and go best with the style of photography I’m going to be taking. I’m going to have the photos around A5 and hang from each other with transparent string so that it doesn’t distract from the pictures. I also want it to hang from string at the top so that the pictures can swing freely from the wall.

Setting up the exhibition

For this project we have three weeks to put up an exhibition and take it down again whilst taking photos to make a narrative story. We need to create pages in our sketchbooks like normal and show our research and ideas growing.

What is narrative photography?

Narrative photography is where photographs (or a photograph) can be used to tell a story even if the story isn’t actually true. Many people believe that you must be able to do narrative photography if you want to be able to take exceptional photos. This is because you want people to be interested in it and be able to find a story within it.

Well known photographers who have done narrative photography:

>Robert Doisneau

foxterriorRobertDoisneau.jpg

article-2129634-0038BFA400000258-59_964x868.jpgdoisneau012.jpg

Doisneau was around in the 1930’s and was mostly taking street photography with a Lieca camera. He won many awards for his photos throughout his life and his most famous photo was of a couple kissing in Paris in the 1950’s. His photos are narrative due to the stories he shows of the people on the street. When you look at his photos you can tell a lot about the people in them and what they are up to. He goes out onto the street to take narrative photos of people that are just out and about, giving us an idea of their stories and the way they’re living. This gave me some ideas for my images, showing me I could take them without being seen.

>Sebastiao Salgado

Sebastião-Salgado-6.jpg

Sebastiao-Salgado-Les-mains-de-lhomme-Mines-de-Charbon-de-Dhanbad-2.jpg

url.jpg

Salgado was a documentary photographer who traveled all over the world to take photos. He captured life as it really was in other countries and it normally wasn’t a pretty sight. Salgado got many rewards for his photos and even became an ambassador for UNICEF. These photos are narrative as they tell you about the people that live in those countries and that they are poor and/or suffering. He takes them by going around the countries and living within the people and capturing their everyday lives. He captures so many things in each picture, and I would like to do something similar within my photos. I want each one to tell their own part of the story. I would also like to travel round the room to take photos from all of the different parts.

>Henri Cartier-Bresson

bresson.jpg

henri-cartier-bresson-9.jpg

url.jpg

Cartier-Bresson is a French photographer well known for his street photography. He’s well know for developing street photography and he also captured (or created) the decisive moment which is shown in his most famous photo of a person jumping off something into water, but his foot hasn’t met the water yet. He was also a painter, meaning he had a superb eye for photos and getting the correct angle. He also had knowledge of the rule of 3. His photos are narrative as they capture everyday life of people on the street without it being posed. He is capturing peoples lives which is a story on it’s own.

>Robert Capa

44008-004-637AA387.jpg

ef1f003ce5285bc54e12115008d2d100.jpg

url.jpg

Capa was a very well known Hungarian war photographer and photo journalist. His war photographs were said to be some of the best, but sadly some of his most famous photos such as the falling soldier were said to be faked so that Capa didn’t have to go to the actual war ground. Sadly, Capa died out at war taking photographs. His photos are narrative as they capture the soldiers at war fighting, allowing people at home to witness it and so they knew how bad it actually was. Capa would’ve had to actually go to these war grounds to take the photographs. His photos tell us a deep story about the life of the soldiers who are fighting for their country and how it isn’t all happy.

>Don McCullin

3034546317_ae8072b77b_o.jpg

2014AA84685.jpg

images.jpg

McCullin is an English photojournalist mostly famous for his war photography.  He first started taking photos in 1959 and is still taking them at the age of 80. His photos mostly showed the underside of society such as the poor, unemployed and less fortunate people. His work is narrative as it shows peoples lives and people at war so that people at home can witness the horrible side we wouldn’t normally be able to see. His photos tell the story of the less fortunate people in this world so that we don’t think that everything is happy go lucky. Just like the others, McCullin actually had to travel the world to take the narrative photos shown above.

>Steve McCurry

AFGRL-10001C_best_12x16_tweaked4MacWorkflow_0.jpg

806d4407e89b0248959cccb4ddc5b470.jpg

565335b22100004a005ab6c9.jpeg

McCurry is an American photojournalist who traveled around taking photos of people in different countries. His most famous photo was of a 12 year old Afghan girl who had piecing green eyes and had a red headdress which was put on the front page of the Nation Geographic magazine. McCurry took photos of people who weren’t well off and his photos were mostly bright colours. His photos are narrative as they show peoples lives to others who normally wouldn’t have the chance to see it. He transports the story of these people over to places where they can easily be seen so that they can be known about. McCurry also travelled the world in order to take photos of people, however most people in his narrative photographs are posing for the camera.

>Tim Hetherington

tim-hetherington-the-face-of-war-2nd-platoon-battle-company-503rd-infantry-regiment-2007-restrepo-cover.jpg

NYC116755.jpg

url.jpg

Hetherington is an English photojournalist that did war photography. Sadly, he died in the 2011 Libyan civil war whilst taking photographs. He won many awards including the World Press photo of the year which he won in 2007. His photos are narrative as they give you the story of war and what the people go through whilst fighting for their country. He captures peoples lives and the suffering they go through because of the war. I don’t feel like I can incorporate this in my work, however you can tell what the people in the photo are doing from what they have, and I could show this in my photos.